HP Stream 7 Video Recorder
As of Dec 2014, we finally have a reasonably small, lightweight, and
inexpensive option for recording analog video directly to a "computer". HP
is now selling the Stream 7 for $99. The Stream 7 is a 7 inch tablet
running 32 bit Windows 8.1 (about the size of the original Amazon Kindle Fire).
When coupled with a USB anlaog video capture "dongle", the Stream 7 will capture
video in a lossless format without dropping frames. This web page provides some
documentation of my configuration and techniques for recording analog video with
the Stream 7.
Windows 10 (Aug 2015). I have done some minimal testing with Windows 10 on a
separate machine (not a Stream 7) and everything seems to work. However,
the install process may require an extra step for some apps. With
VirtualDub I had to go to the VirtualDub.exe file, right-click to bring up
properties, click on "unblock", then click on "more info" for dialog that
Windows brought up, and enable to button to tell Windows 10 to always remember
to unblock this app. You may have to do this for other "simple install"
(copy only) programs.
Components:
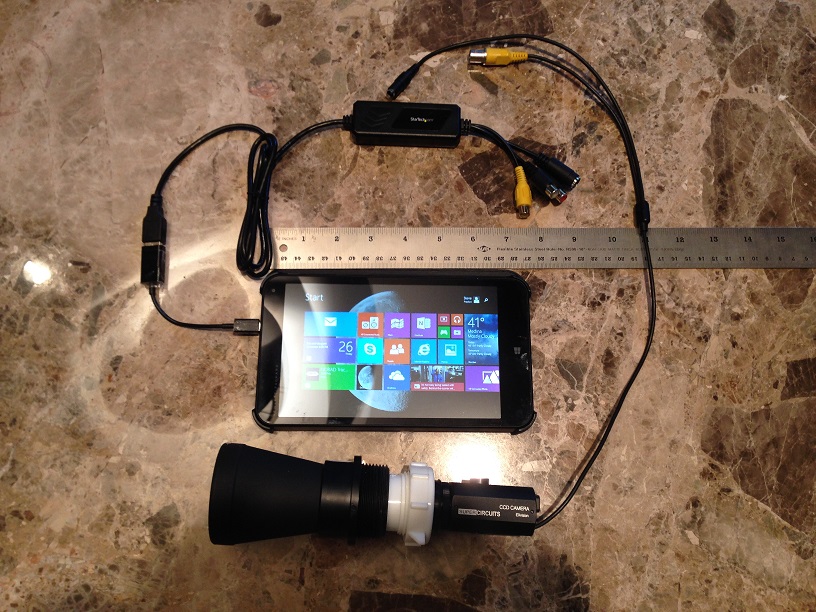
COMPONENTS:
- HP Stream 7 Windows 8.1 tablet ($99)
-
StarTech 3-Feet USB Y Cable for External Hard Drive - Dual USB A to Micro B
(USB2HAUBY3)
- ($8)
-
F to F USB gender changer (Cable
Matters 2 pack)($4)
-
StarTech SVID2USB2 Video Capture device: S-video/Component version ($45)
- PC-164C video camera + "mighty-mini" (shown for size comparison with
other components)
- micro-USB OTG cable ($6) (StarTech
version) (not pictured but you should get one for times when you don't
want to connect external power to the Stream)
- Capacitive touch stylus ($6) (not pictured) - more accurate and reliable
than your finger on a small screen - very handy. AmazonBasics or
BestBuy or ...
The Stream 7 is sold on Amazon, at Microsoft retail stores, Office Depot, and
probably others places I haven't checked. I bought the StarTech SVID2USB2
video capture device via Amazon (linked above for reference). And I bought
the StarTech OTB cable from Amazon (linked above). Other OTG cables will
probably work as well. But I have only tried the StarTech one so far.
Stream 7 Initial Setup:
When you first power on the HP Stream 7 it will take you through the
standard setup process for a Windows 8 computer. Most of this process is
obvious. The main question is your login. But I recommend that you
also connect your Stream 7 to the internet during the initial setup. The
Stream has wifi and I think the startup process gives you an option to connect
to a local wifi network. So I recommend that you do the intial start-up
while in range of a wifi network.
Like all Windows 8 devices, your Stream 7 login will be a "Windows account".
If you already have a Windows 8 computer I recommend that you start with the
same login as your primary login for this device. In this case, the setup
process will ask if you want to transfer your Microsoft applications to this
Stream 7. I recommend you say "no" at first to save space on the device.
You can always pull in your apps later if you want them on this device. If
you don't already have a Windows 8 computer, you may need a "Windows account".
If you have a hotmail account (the original free email system from Microsoft),
you will probably want to use that login. Or, if you have previously setup
an account with Microsoft "Live" or "SkyDrive" or "outlook.com", you should
probably use that login. If you haven't setup an "Windows account" via any
of these services, I recommend that you start by setting up an account with
"outlook.com" and use that email/password login as your login for the Stream 7
(and therefore you basic Windows account).
After the intial Windows configuration I recommend the following changes to
the default settings:
- Enable Standard keyboard.
Normally, the tablet will pop up a "touch" keyboard on the screen when you
need to enter text. Some applications are not designed for a touch
device so you must bring up the keyboard manually by touching (clicking) on
the small keyboard icon on the right side of the taskbar (at the bottom of
the screen in desktop mode). The default version of the touch keyboard
shows only some of the keys that are on a standard keyboard. I
recommend that you enable the standard keyboard configuration for the touch
keyboard. With the standard keyboard, the "keys" will be smaller on
the screen but the additional keys are very useful. To enable the
standard keyboard: go to the "Start" screen, search for PC Settings, PC and
devices, Typing, enable standard keyboard.
- Disable auto-rotate. The
screen display on the Stream can appear in either portrait or landscape
orientation. If you align the tablet with the long side vertical, the
screen displays in portrait mode. If you align the tablet with the
long side horizontal, the screen displays in landscape mode. Windows
"automatically" rotates the dispaly as you change the orientation of the
tablet. I prefer to disable "auto-rotate" and leave the tablet in
landscape mode. The landscape configuration works better with the apps
that I use for screen capture. To disable auto-rotate: Go to landscape
mode, go to desktop, bring up the context menu for the display ("touch" and
hold for a couple of seconds on an area of the desktop background screen
which has no icon, the release the "touch"), choose "screen resolution" from
the menu, turn off auto-rotate.
- Power Management : never sleep.
In the default configuration, the tablet will switch to "sleep" mode after a
few minutes of idle time. Because I plan to use this tablet for
unattended recording I changed the default settings so the tablet never goes
to sleep "automatically". Otherwise the tablet might go to sleep while
waiting to record and not "wakeup" for the recording. With this
change, I must click the power button to put the Steam 7 in sleep mode.
To make this change: go to the desktop, click on the battery icon on the
taskbar (bottom right part of the screen), select "more power options",
select "Change plan settings", and change both "Put the computer to sleep"
options to "never".
- "iota" user account. I also setup
an additional user account (Windows login) as a "guest" account. Since
my standard windows login accesses email and other "personal" information I
wanted a separate login for "guests". If I lend the Stream to someone
else, or just let them operate it as part of a occultation observation, they
can login with the guest account (and I don't have to tell them my password
for my standard Windows account). To setup this up I started by going
to outlook.com and setting up an account with the user name "iotasbp".
Then I added this account to my Stream 7 as follows: go to the Start Screen,
swipe in from the right edge of the screen, select "Settings" from menu,
select "Change PC setttings", select "Accounts", select "other accounts",
select "Add an account". I setup the account with administrator priviledges
- just in case some software requires this option.
- airplane mode . Put the stream in
airplan mode when you don't need wifi access. This reduces the chance
that Windows will generate a random pop-up status message while you are
recording. And airplane mode saves battery power.
Stream 7 - additional software
- Lagarith 32 bit codec. I strongly
recommend the lagarith codec for the captured video. And MP4 codec
will produce smaller files but the MP4 codec uses lossly compression.
Lagarith is lossless compression and yields high quality with signficantly
smaller files than simple uncompressed capture. The smaller files
allow more recording time on the device and also reduce the risk of dropped
frames during capture. The Lagarith codec is free. You will find
the Lagarith installer via the
Lagarith website (use the installer version rather than the manual
install version).
- VirtualDub. I am currently using
VirtualDub as my primary "video capture program". OccuRec seems to
work as well but I haven't done as much testing with it yet. I will
add OccuRec to this page after I have a chance to do more testing with
OccuRec. To install VirtualDub: download the zip file for the latest
32-bit windows release from the
VirtualDub downloads page; create a folder called "VirtualDub" under
"c:/Program Files" (on the Stream 7); copy the contents of the zip file to
the "c:/Program Files/VirtualDub" directory. Now create a shortcut to
VirtualDub on the desktop: in desktop mode, view the VirtualDub directory in
the Windows explorer (folder viewer), bring up the context menu for the file
VirtualDub.exe ("touch" the file, hold for two seconds, then release the
touch), and select "create shortcut".
Stream 7 - Install drivers for StarTech SVID2USB2
I have successfully installed the SVID2USB2 drivers using two different
approaches. The easiest approach works if you install the drivers BEFORE
you connect the SVID2USB2 for the first time. If you connect the SVID2USB2
before installing the drivers, you can use the second approach to replace the
default Windows drivers with the StarTech drivers.
The following steps are a little convoluted, but it worked. Also ...
you may find it easier to navigate some of these steps using the touch keyboard
rather than the touch screen "clicks". Reminder... in desktop mode you can
bring up the touch keyboard by clicking (touching) the small keyboard icon
located in the taskbar (bottom right edge of the screen). I suspect there is a
more direct method of installing the drivers for the SVID2USB2 device. If
I find a shorter method I will post it. In the meantime, here is the
method that worked for me.
- Copy the Driver Files. The SVID2USB2
comes with a DVD. Copy the subdirectory called "driver" from the DVD
to a folder on the Stream 7 (e.g. /tmp/StarTech/driver). But ... the
Stream doesn't have a DVD driver! So ... I put the DVD in my Windows
laptop, copied the StarTech files from the DVD to the hard drive on my
Windows laptop, then copied the StarTech files from my laptop to the Stream
via my local network connection. Or... you can download a
zip file containing
driver files that I copied from my install DVD.
- Install Drivers (easiest method)
- go to the "driver" subdirectory and run "setup.exe" to install the
drivers.
- Plug in StarTech SVID2USB2. Connect OTG cable to the Stream 7's
micro-USB port and connect the SVID2USB2 to the other end of the OTG
cable. If Windows brings up a dialog for installing drivers, just close
it.
- You are now done installing the drivers for the SVID2USB2
- Install Drivers (optional method to replace
default windows drivers with StarTech drivers).
- Open the control panel. Go to the desktop. Swipe in from
the right edge. Select Settings. Select Control Panel.
- Change the driver:
- In the control panel, select "Hardware and Sound".
- under "Devices and Printers", select "Device Manager"
- expand the "Universal Serial Bus controllers section" and select
the "USB composite device" in this section
- In the device manager menu bar, under "Action", select "Update
driver software"
- Select "Browse my computer for driver software"
- Navigate the the directory containing the StarTech 32 bit
drivers (e.g. /tmp/StarTech/driver/Manual Driver/32-bit/) and select
this directory to install the 32 bit StarTech drivers.
Capturing Video with Virtual Dub (Basic approach)
With this approach, you manually start/stop the capture as if you were
hitting the Record button on a camcorder. You should follow these steps at least
one time to setup the capture device and verify that your setup works as
expected. The Stream 7 has about 16GB of free
space (unless you install lots of additional data or programs). With the
Lagarith codec the AVI file will be about 4GB for a 10 min recording. That is
long enough for almost any attended occultation recording. You can record
longer by installing an optional micro-SD card in the Stream 7 (I have tested it
with a 64gb micro-SD card). But I think the battery life will be limited
to about 90 minutes of recording time. And that is a good segway into battery
considerations... the Stream 7 has limited battery life. When not
recording, the Stream 7's internal battery will last about 3 hours. To
save battery power when not using the device, put the Stream 7 in sleep mode (or just shut it down). Only
connect the SVID2USB2 when you are about to record - this device will drain the
Stream 7 battery in a couple of hours - even when not recording. If you
don't need an internet connection, put the Stream 7 in airplane mode to save
battery life as well.
The capture steps are simple: connect the hardware, start VirtualDub, and
tell VirtualDub to start/stop the capture.
- Connect the Hardware
- Connect the OTG cable to the Stream 7's micro-USB port
- Connect the SVID2USB2 to the other end of the OTG cable
- Connect the video camera output to the yellow RCA jack of the
SVID2USB2
- Start VirtualDub
- Assuming you have VirtualDub shortcut on the desktop... double-click
on the VirtualDub shortcut.
- Now we put VirtualDub in Capture Mode. From the main menu,
select "File", then "Capture AVI"
- Now select the SVID2USB2 device. From the menu, select
"Device", then "USB 2821 Device". VirtualDub will "remember" this
setting so you probably won't need to do this after the first time.
After this connection is made, the "live" video should appear in
VirtualDub's capture window on the Stream.
- Set the video compression. From the menu, select "Video", then
"Compression", then select "Lagarith Lossless codec". VirtualDub
will remember this setting so you this should be a one-time setting.
- Set the capture file. Unfortunately, this part can be tricky
since VirtualDub was not designed to accomodate a small touch screen
device like the Stream 7. Hopefully I can find a good workout for
this dialog. In the meantime... :
- option 1: "touch" click navigation. Using "touches", click
on the "File" option of the menu, then click on "Set capture file".
The text is small so it is easy to select the wrong entry -
particularly the "set striping system" option - which you don't
want. If you select that option, cancel and try again.
After you sucessefully bring up the "Set Capture File" dialog,
browse to the directory you want for your capture file, bring up the
touch keypad via the icon on the taskbar, type in your filename fo
rthe capture file, and hit the enter key. Unfortunately, you
won't be able to see your filename while typing it in during this
step (another screen size limitation).
- option 2: "touch keypad". IF you have already set your
capture directory and just want to change the filename... Bring up
the touch keypad via icon on the taskbar, hit the "Fn" key to enable
the function key options, and hit F2 to bring up the Set Capture
File dialog. Now enter the filename (you won't see your
typing) and hit enter.
- Start/Stop the capture
- Start the capture. The easiest method is the touch keyboard...
hit F6 on the touch keypad. Or you can select "Capture", then
"Capture video" from the menu.
- Stop the capture. The easiest method is the touch keyboard...
hit ESC. Or you can select "Capture", "Stop capture" from the menu.
Capturing Video with VDocc
I have modified the "helper program" VDTimer to create an app called VDocc.
VDocc "drives" VirtualDub for you and makes recording much easier on the small
screen of the HP Stream 7. VDocc also has a timer mode where you can setup
the HP Stream to record a short segment of video at a specific time : you
specify a recording duration and central time for the recording interval (e.g.
record for 10 minutes centered at 04:04:04 UT). You can download VDocc via
this zip file.
Unzip the .EXE file from this zip file to a directory on your computer (e.g.
Stream 7) and create a shortcut to it. This app is helpful for any
computer, not just the small screen of a Stream 7. If you install it on
Windows 10, you may need to "unblock" the EXE file before you can run the app. The first time you run VDocc, go to
the settings to specify a capture directory and the location of VirtualDub.exe.
VDocc also has an option to put the computer in hibernation after finishing a TIMER
recording. This is a good idea if the computer is running on battery power
and may run out of battery before you can return to the computer to shut it down
properly. This option is enabled by default but you can turn it off.
POWER:
Since the Stream 7's battery will only power a video capture setup for about
3 hours of "standby" time, we would like to have other options to extend this time for unattended
recordings. The Stream 7's power one "port" is an OTG USB connection
and
both power and the video capture device (USB) must be plugged into this same
connection. Unfortunately, a standard powered USB Hub will not power both
the video capture card and the Stream 7's battery. Similarly, most "USB
y-cables" don't extend the standby time of this setup either. After some testing with
a couple of different options I have identified a set of y-cables which will keep
the Stream 7's battery charged while the Stream 7 is connected to the StarTech
capture device (this cabling setup is described below).
With this cabling setup, the following list gives the the Stream 7 "stand by"
time with different power sources.
- With AC power: stand-by time seems to be unlimited.
- With my Anker 10000 mAh power bank: stand-by time is 11 hours
- With AA 8 cell battery pack and 8 rechargeable AA NiMH batteries:
stand-by time is 6 hrs
- With AA 8 cell battery pack and 8 AA lithium batteries : stand-by time
is 9 hours
***NOTE:
this y-cable WON'T work if you don't have power applied to the Red connector
(via AC or DC power bank). Without this power source you must use a simple
micro-USB OTG cable as listed above.
Here is the info on the power cabling:
NOTE: This setup requires that you connect components in
a specific order. If you don't follow the right order, the Stream 7's
battery will slowly lose charge and eventually run out. Even if you don't
follow the right setup and the battery drains down, the battery will still last
many hours ( probably 10 to 12 hours). But the correct steps will keep the
Stream 7 battery charged as long as power is applied to the cables (from an AC
adapter or battery pack).
1) StarTech 3-Feet USB Y Cable for External Hard Drive - Dual USB A to Micro B
(USB2HAUBY3) - $8
http://www.amazon.com/gp/product/B0047AALS0/ref=oh_details_o07_s00_i00?ie=UTF8&psc=1
2) F to F USB gender changer - $4
http://www.amazon.com/gp/product/B000BSN4UY/ref=oh_details_o06_s00_i00?ie=UTF8&psc=1
With the USB2HAUBY3 cable above:
-
*** First: ensure that a video is signal is present
on the video input of the StarTech capture device
-
Plug the USB gender changer into the standard size
BLACK USB connector, of the USB2HAUBY3 cable,
which has two cables emerging from it.
-
Plug in the StarTech capture device into the other
end of the USB Gender changer.
-
Plug the USB2HAUBY3 cable's RED USB connector into the USB socket of the Stream's
AC power brick.
Or you can plug this connector into a USB battery pack. I have
had good luck with the 10000mAh Anker power bank ($25).
-
Plug the USB2HAUBY3 cable's micro USB connector into
the Stream.
Viewing/Analyzing Captured AVI files:
- Lagarith codec - since these files were captured using the Lagarith
codec, you must have the Lagarith codec installed on whatever computer you
use to view or analyze the captured AVI file.
- Copying the AVI files from the Stream 7. The Stream 7 has WiFi.
The capture file directory on my stream 7 is setup for sharing. The
Stream 7 connects to my home wifi network and I can download the video files
across the network to my desktop. But it is SLOW - these video files
are big. If don't have a network connection ... you could copy the
video file to USB memory stick to the Stream (unplug the StarTech SVID2USB2
and plug in the memory stick). Probably also slow.
- LiMovie - when using LiMovie with these files, set LiMovie to read files
using DirectShow - via the menu item Option/Update Setting Items, the File
Reading pane.
TBD:
- OccuRec: This app from Hristo also seems to work with the
Stream+SVID2USB2. But I need more time testing...
HISTORY:
- 2015-09-30 - reworked some wording in the power section.
- 2015-09-23 - added more timings for power sources
- Revised info on USB OTG cabling (sbp)
- More info added 2015-Aug-28 (sbp)
- More info added 2015-Apr-11 (sbp)
- originally posted: 2014-Dec-27 (sbp)